
Working with Items
- Operador de inventario físico
- Técnico de inventario físico extendido (requerido para eliminar operaciones)
Users with these roles can work with physical resources only within the scope defined for the role in the User Details page, see Managing User Roles.
You create, edit, and delete physical resources — inventory that corresponds to physical items in your library — using various editors and jobs.
Con la Catalogación rápida, se pueden añadir ejemplares físicos a su inventario. Se pueden añadir los siguientes tipos de ejemplares:
- Items for existing titles (add inventory to an existing holdings record) — Adding a Physical Item to an Existing Title
- New items (add inventory together with new holdings and bibliographic records) — Adding a New Book or Journal Article
For more information, watch Purchasing Physical Items. (7:27 min.)
El siguiente resumen indica una referencia rápida (de tareas involucradas) para las secciones tratadas en esta página.
- Resources > Add Physical Item — Libraries that have bibliographic and holdings records for a title need only to add a new item (new inventory), see Adding a Physical Item.
- Via New Metadata Editor — When editing a holdings record, add inventory, see Adding a New Book or Journal Article. In addition, see Navigating the New Metadata Editor Page and Add Item for more information.
- Working with the List of Items- The List of Items page lists physical items related to a physical title.
- Via a Repository Import Profile - Import items using an Excel or XML file that contains a list of items. See Managing Import Profiles.
- Import items via an API - For that, your institution would need to write an application that creates/updates the items with the API.
Adding a Physical Item to an Existing Title
Si la biblioteca ya cuenta con registros de existencias y bibliográficos para un título y solo se necesita añadir un nuevo ejemplar (nuevo inventario), se puede usar la Catalogación rápida para añadir el nuevo ejemplar. You must know the item's barcode to complete this procedure.
There is no limitation on the number of physical item records that could be added to an existing title.
- From the Choose Holdings Type dialog box (Resources > Create Inventory > Add Physical Item), select the Existing option and select Choose. Aparece la página Catalogación rápida para los recursos existentes.
- En la sección Información de recursos, buscar el título del ejemplar.
- When you select your title, the Title field populates with your selection. The Library and Location fields populate based on the Title selection.
- Introducir el código de barras para el ejemplar y, opcionalmente, añadir los siguientes parámetros:
- Use item template- Enables users to select a template to use in the Add Physical Item quick cataloging form, that automatically populates the item created by that form with the template's data. Use the magnifying glass drop-down menu or the find (arrow) icon to select from Recently Used,My Templates(Private), or Public templates. La plantilla abarcará todos los detalles del ejemplar excepto el código de barras, número de inventario, información de patrón, tipo de proceso En (solicitar departamento), prefijo/sufijo de clasificación del ejemplar y prefijo de clasificación temporal.Watch the Item Templates video (3:23 mins).
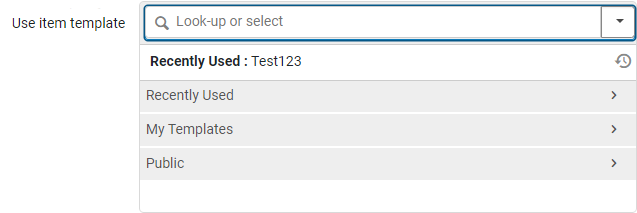 Use el menú desplegable de la plantilla del ejemplar
- Description— The text you enter appears in the list of holdings for the item (see Working with the List of Holdings).
- Material Type— Use the magnifying glass drop-down menu or the find (arrow) icon to find and select a value for Material Type. The material type appears only in Primo's Get It and Details tabs. For information on customizing the labels of the material types, refer to Configuring Physical Item Material Type Descriptions.
- Item Policy— Use the magnifying glass drop-down menu or the find (arrow) icon to find and select a value for Item policy.
- Public Note— Optional.
- Use item template- Enables users to select a template to use in the Add Physical Item quick cataloging form, that automatically populates the item created by that form with the template's data. Use the magnifying glass drop-down menu or the find (arrow) icon to select from Recently Used,My Templates(Private), or Public templates. La plantilla abarcará todos los detalles del ejemplar excepto el código de barras, número de inventario, información de patrón, tipo de proceso En (solicitar departamento), prefijo/sufijo de clasificación del ejemplar y prefijo de clasificación temporal.
- Select Save. El ejemplar es añadido al inventario. You are returned to the Alma home page.For locations with RFID and an active RFID connection, you have the additional option to Write to RFID and Save. When the information has successfully been written to the RFID, the information is saved to the Alma database. For additional information, see RFID Support. If you only want to update information in the Alma database, select Save.
Adding a New Book or Journal Article
Se puede añadir un nuevo ejemplar junto con un nuevo registro bibliográfico o de existencias.
-
From the Choose Holdings Type dialog box (Resources > Create Inventory > Add Physical Item), select the New option.
-
Select the Citation Type(Book or Article) and select Choose. Aparece el formulario de Catalogación rápida. Los parámetros para las entradas de libro y de revista son diferentes.
-
Introducir valores en los campos Información del recurso para el libro o artículo usando la tabla siguiente. Donde así se señale, algunos parámetros solo son relevantes para un libro o un artículo. Además, el orden de los parámetros es diferente para libros y artículos.
Todos los registros bibliográficos breves creados por el formulario de Catalogación rápida tienen los campos LDR y 008 "determinados por" si son físicos o electrónicos.- Todos los materiales físicos se catalogan como libros.
- Todos los materiales electrónicos se catalogan como recursos continuos.
Campos de información del recurso Campo Descripción Title / Article/Chapter Title (Required) El título del libro, artículo o capítulo Título de la revista (artículo) El título de la revista que contiene el artículo Autor El autor del libro o artículo Iniciales del Autor The author's initials Edición (libro) Número de edición del libro Tomo El número de volumen del libro o de la revista que contiene el artículo Fascículo (artículo) El número de fascículo de la revista que contiene el artículo Error al recuperar datos del patrón de publicación. El número de libro estándar internacional (ISBN) o el numero de serie estándar internacional (ISSN) que identifica el libro o artículo LCCN El número de control de la Library of Congress Número de control del sistema Un número identificador central, como un número Online Computer Library Center (OCLC) Otro ID estándar This value of this field can be set in the 024$$a field in the MD Editor. Código de barras Este campo se utiliza para fines de intercambio de recursos. En la creación de solicitudes de préstamo, la sección de ejemplares no existe. Sin embargo, si el prestatario conoce el código de barras del prestador (p. ej., en redes o agentes externos), se coloca en este campo y se realiza la "localización" en función de este campo.
ID del registro remoto MMS ID Editor El editor de esta edición del libro o revista Fecha prevista de llegada Date of the book or article's publication DOI (artículo) Identificador de objeto digital para el ejemplar PMID (artículo) ID de la base de datos PubMed Lugar de publicación El lugar en el que se publicó el libro o artículo Nombre de persona adicional El nombre de un contacto adicional Origen Fuente de datos del ejemplar (MARC 21 campo 786 o 590) Número del título de la serie Número del título de la serie en la que está ubicado el ejemplar Clasificación/signatura (libro) La clasificación/signatura del libro. Indica la estantería de la biblioteca en la que está ubicado el libro Nota Un campo para notas, según se necesite Parte (libro) Número de parte del libro Número de capítulo / Capítulo El número de este capítulo del libro o la revista que contiene el artículo Páginas El rango del número de páginas de la revista que contiene el artículo (ej. páginas 57-69). Las páginas no tienen que ser necesariamente numéricas. Página de inicio La primera página de la revista en la que aparece el artículo (o libro en el que aparece el capítulo) Página final La última página de la revista en la que aparece el artículo (o libro en el que aparece el capítulo) Autor del capítulo (libro) Para el capítulo de un libro, el autor de dicho capítulo Título del capítulo (libro) Para el capítulo de un libro, el título de dicho capítulo Editor (libro) El editor del libro (típicamente usado para libros donde los capítulos tienen autores diferentes) Curso restringido Whether you want the item to be searchable in Primo only within a Courses search scope (once you set up the appropriate Primo search rules). This field appears only if the course_restricted_field parameter is set (see Configuring Other Settings).Suprimir desde descubrimiento Whether to block the bibliographic record from publishing to Primo. Formato del registro El tipo de registro que se va a crear. Este campo aparecerá solo si el sistema es compatible con múltiples formatos de registro. Póngase en contacto con la asistencia técnica de Ex Libris para habilitar esta función. - En la sección Información del ejemplar, introducir y seleccionar el nombre de la biblioteca donde se quiere que se ubique el ejemplar, o seleccionar el icono de la flecha para abrir una lista de las bibliotecas y seleccionar una. Once you select a library, the page refreshes and additional fields appear below the Library field, including one additional required field. Introducir los valores para la sección Información del ejemplar, como se indica en la tabla siguiente.
Campos de información del ejemplar Campo Descripción Copia personal Indica si el ejemplar físico es propiedad del instructor. If selected, the Personal copy of field will replace the Location field to allow you to specify the owner of the physical copy. For more details, see Contributing Instructor Resources to a Reading List.
Copia personal de If the Personal copy field is selected, specify the owner of the physical item, which will be used for the item's location. Para que el ejemplar pueda circular, debe moverlo a una ubicación temporal. De lo contrario, se suprimirá del descubrimiento. For more details, see Contributing Instructor Resources to a Reading List.
Los ejemplares que se mantienen en la ubicación de un instructor no forman parte en ese momento de la colección de la biblioteca, y están almacenados físicamente con el instructor.
Localización La ubicación dentro de una biblioteca donde se guarda el ejemplar físico. Usar la función del menú desplegable o seleccionar la flecha para abrir una lista de bibliotecas disponibles y sus ubicaciones. Código de barras Introducir el código de barras del ejemplar. If you leave this parameter blank and you chose during your Alma implementation to implement barcode generation, a barcode will be automatically generated for the item when it is saved. Si se han configurado múltiples secuencias del contador de códigos de barras, se usa la secuencia del contador de códigos de barras predeterminada. See Configuring the Barcode Generation Method and Barcode Validation for more information.For locations with RFID and an active RFID connection as indicated by the connection icon ( ), the barcode can be added for the Barcode parameter by selecting the RFID read icon (or Alt+A).
For additional information, see RFID Support.LCCN El tipo de material del ejemplar. Usar el menú desplegable o la flecha para abrir una lista de posibles tipos. The material type manifests itself only in Primo's Get It/Details tabs. (For information on customizing the material type labels, see Configuring Physical Item Material Type Descriptions.) Política del ejemplar La política de préstamo del ejemplar con respecto a la duración del periodo y otras restricciones. Usar el menú desplegable o la flecha para abrir una lista de las políticas disponibles. Nota no pública A note that appears in Primo's Get It/Details tab. - Select Save.When the new item is created, it is created in place and a 'Pick from shelf' request is created for it. After the item is scanned in at the relevant acquisition desk, the Acquisition Technical Services work order is created, to be used for complete cataloging at a later time. For an in-depth overview of work orders, see Physical Inventory - Defining and managing work orders in Alma.
-
For locations with RFID and an active RFID connection as indicated by the connection icon ( . ), you have the additional option to Write to RFID and Save. When you select Write to RFID and Save, the information is written to the RFID. When the information has successfully been written to the RFID, the information is saved to the Alma database. If you only want to update information in the Alma database, select Save. For additional information, see RFID Support.
Creating and Updating Items in Bulk
Los métodos de abajo le permiten crear nuevos ejemplares y actualizar ejemplares existentes en masa. Use cualquiera de estos métodos para crear o actualizar sus ejemplares con las mismas características.
- Use la tarea "Cambiar ejemplar físico". See Change physical items job.
- Via a Repository Import Profile, import items using an Excel or XML file that contains a list of items. See Managing Import Profiles.
- Import items via an API. Para eso, su institución necesitaría escribir una aplicación que cree/actualice los ejemplares con la API.
-
Se recomienda probar el proceso en un número reducido de registros antes de intentar importar un gran número de registros.
-
Para asegurarse de que el registro bibliográfico no se dañe en el proceso, se recomienda que encuentre el registro bibliográfico, lo guarde como un conjunto y ejecute la tarea Exportar Registro Bibliográfico. Luego, use este registro bibliográfico como parte del fichero de entrada. Otherwise, if needed, you can restore an earlier version of the bibliographic record via the Metadata Editor.
Working with the List of Items
La página Lista de ejemplares enumera los ejemplares físicos relacionados con un título físico. Esta página aparece después de seleccionar:
- Items in the results after a search for a physical item (see Searching Alma)
- View all items in the Physical Item Editor (see Updating Item-Level Information)
La página Lista de ejemplares proporciona las siguientes columnas de información listas para usar:
- Código de barras
- Biblioteca
- Localización
- Código de barras
- Clasificación del ejemplar
- Sem.
- Tomo
- Descripción
- Localización temporal
- Estado
- Tipo de proceso
- Número de acceso
- Fecha recepción
The columns in the list of items can be configured by clicking on the cogwheel icon in its top right corner, so a user can select which of the optional columns they'd like to show/hide for their work.
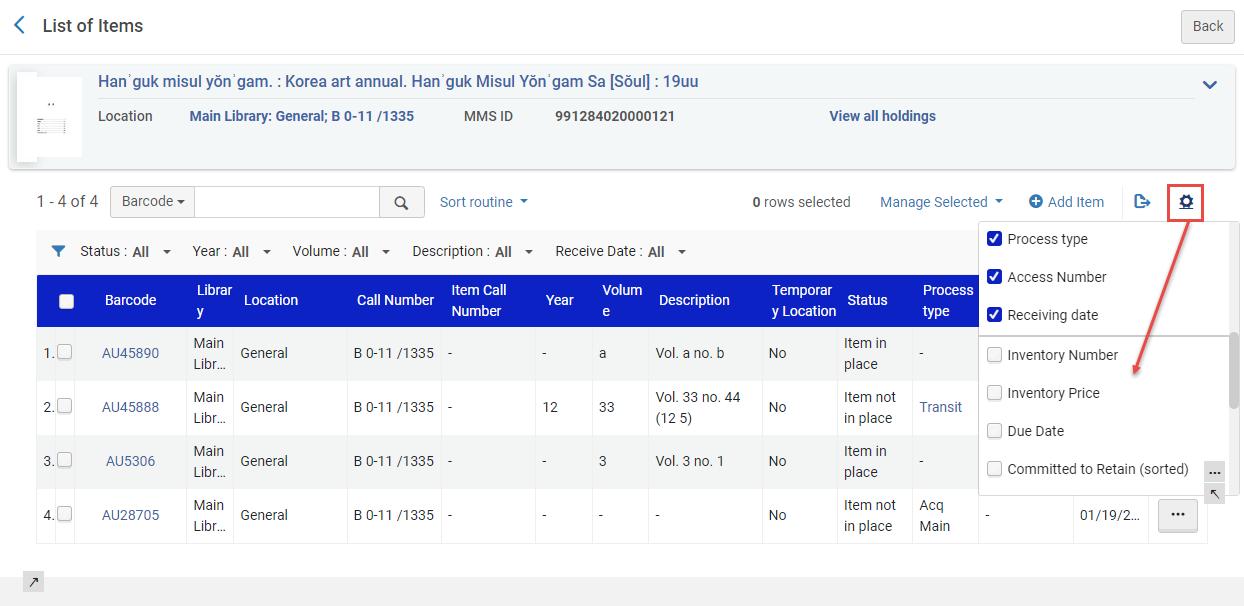
Otras columnas que pueden añadirse son:
-
Número de inventario
-
Precio de inventario
-
Fecha de vencimiento
-
Compromiso de retención (ordenados)
-
No.º de solicitudes
-
LCCN
-
Política del ejemplar
-
ID de la copia
-
MMS ID
-
Procedencia
- Identificación de la ubicación de almacenamiento
La página Lista de ejemplares contiene los siguientes filtros:
- Estado - Las opciones de filtrado son Todos, El ejemplar no está en su lugar y Ejemplar en su lugar.
- Biblioteca - Las opciones de filtrado para Biblioteca dependen de las bibliotecas que se hayan configurado.
- Location - The filtering options for Location are dependent on the locations that you have configured.
- Year - The filtering options presented in the drop-down list are determined by the year content specified in the Chronology I parameter in the Physical Item Editor for the items listed.
- Volume - The filtering options presented in the drop-down list are determined by the volume content specified in the Enumeration A parameter in the Physical Item Editor for the items listed.
- Description - The filtering options presented in the drop-down list are determined by the description content specified in the Description parameter in the Physical Item Editor for the items listed.
- Fecha de recepción - Las opciones de filtrado son Todos, Recibidos, y No recibidos. This filter uses the date information provided in the Receiving date field as entered in the Physical Item Editor. Cuando selecciona la opción Recibidos, se filtra la lista para mostrar todos los ejemplares con fecha de recepción del día o anterior. Selecting the Not Received option filters the list to show only the records with a future date or no date specified in the Receiving date field.
For more information, see the Filter a List of Items video (0:47 mins).
La página Lista de ejemplares contiene los siguientes enlaces de páginas:
- Resource description— Open the MARC simple Record View page for the bibliographic record. See Viewing Metadata Read-Only in the Simple Record View Page.
- Location – Open the MARC simple Record View page for the holdings record. See Viewing Metadata Read-Only in the Simple Record View Page.
- View all holdings— Open the List of Holdings page. See Working with the List of Holdings for more information.
The barcode link (Barcode column) opens the Physical Item Editor page, which enables you to filter the list of items by status and sort according to the sort routines that were configured (see Configuring Physical Item Sort Routines).
Items with an empty Description column are monographs. Items with text in the Description column are serials.
Las siguientes acciones de la fila están disponibles:
- View hidden— View any hidden columns.
- View— View the item in the Physical Item Editor page.
- Edit— Edit the item in the Physical Item Editor page. For more information, see Updating Item-Level Information.
- Duplicate— Duplicate the item using the Physical Item Editor page. Téngase en cuenta que las notas internas y estáticas también son copiadas al nuevo ejemplar cuando se duplica un ejemplar existente. For more information, see Updating Item-Level Information.
- Change Location— Submit a permanent or temporary move item request on the Create Request page. For more information, see Creating a Request.
- Withdraw(if you have the required permissions) — Delete the item, after confirming. Select OK to remove the item. For more information on withdrawals, see Withdrawing One or More Items.Si el ejemplar tiene la etiqueta "Compromiso de retención", no se puede borrar. Users receive the following confirmation message: "The item is marked as 'Committed to Retain' and cannot be deleted." To delete the item, users need to set the item's "Committed to Retain" to No and then withdraw the item. For more information, see Updating Item-Level Information.
- Toggle missing status— Toggle the item status between Item in place and Item not in place. The Process Type also toggles to Missing when the status is Item not in place. This option appears if there is no process type or if the process type is Missing,In Process, or In Transit for roles with relevant privilege and scope. You can search for items by process type 'missing', create sets in Alma, and generate reports in Analytics. The "Missing" process type can also be used to prevent requesting:https://knowledge.exlibrisgroup.com/Alma/Knowledge_Articles/How_to_allow_requests_for_missing_items
- Work order— Create a work order process for the item on the Create Work Order page. For details on work order requests, see Creating a Work Order Request.
- Clear Selection— This option clears the selection and does not withdraw items.
The Manage Selected dropdown allows you to perform the following actions on one or several item records by selecting the checkboxes for these records:
- Las siguientes acciones están disponibles para registros con existencias únicas. Para registros con existencias múltiples, las acciones están disponibles desde la Lista de existencias y no desde la Lista de ejemplares.
- Cuando la lista de registros de ejemplares se muestra en múltiples páginas, las opciones de los botones solo se ejecutan en las filas seleccionadas en la página que se esté visualizando en ese momento. Este es un problema conocido.
- Run a job(if you have the required permissions) — Select the job to run on the selected items. For details, see Running Manual Jobs on Defined Sets.
If you are configured with a role that is supported for running a job (one of the required permissions), and your role is configured for a certain Library, then when you enter the Items List page for a holding defined for a different Library, you do not see the Run a Job option on the Manage Selected menu. Se trata de un Problema Conocido que se solucionará en las versiones futuras.
- Create Itemized Set/Add to Itemized Set(if you have the required permissions). For details, see Creating Itemized Sets/Edit Itemized Sets.
- Bind Items— Select the check box of at least two items to bind the selected items together into one. For details, see Binding (Merging) Items in the List of Items below. El botón está disponible si el registro bibliográfico asociado del ejemplar solo tiene un registro de existencias.
- Change Holdings— Link to a different holdings record on the List of Holdings page. For more information, see Working with the List of Holdings.
- Open Predicted Items— Opens the list of predicted items. See Prediction Patterns for more information.
- Withdraw Items(if you have the required permissions) — Delete the item, after confirming. Select OK to remove the item. For more information on withdrawals, see Withdrawing One or More Items.Si el ejemplar tiene la etiqueta "Compromiso de retención", no se puede borrar. Users receive the following confirmation message: "The item is marked as 'Committed to Retain' and cannot be deleted." To delete the item, users need to set the item's "Committed to Retain" to No and then withdraw the item. For more information, see Updating Item-Level Information.
- Relink to Another Bib— Move from one bibliographic record to another bibliographic record. For more information, see Relinking Items to Another Bibliographic Record.
The Add Item option allows you to add an item in the Physical Item Editor. After entering the basic item information, if you have additional information to add to the tabs below (or view), use the Save and Edit option to display those tabs.
- Información ENUM/CHRON
- Notas
- Historial
The Add Item from Template option enables users to select a template to use in the Add Physical Item quick cataloging form that automatically populates the item created by that form with the template's data. Once the option is selected, use the magnifying glass drop-down menu or the find (arrow) icon to select from Recently Used,My Templates(Private), or Public templates. La plantilla abarcará todos los detalles del ejemplar excepto el código de barras, número de inventario, información de patrón, tipo de proceso En (solicitar departamento), prefijo/sufijo de clasificación del ejemplar y prefijo de clasificación temporal.
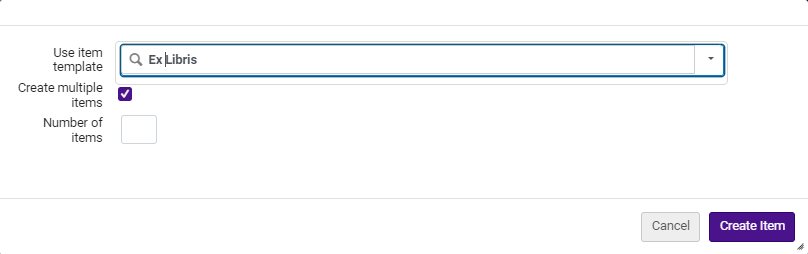
Users can add multipleitemsto a holdings record using Add item from template and specifying the desired quantity. Esto inicia un proceso que genera múltiples ejemplares dentro del registro de existencias, prerellenado en base a la plantilla de ejemplar seleccionada.
Cuando se utiliza una secuencia de código de barras, el sistema verifica la secuencia actual durante la creación de cada ejemplar para mantener la unicidad del código de barras. En consecuencia, los códigos de barras pueden no aparecer secuenciales si otros ejemplares se crean simultáneamente utilizando la misma secuencia dentro de la institución.
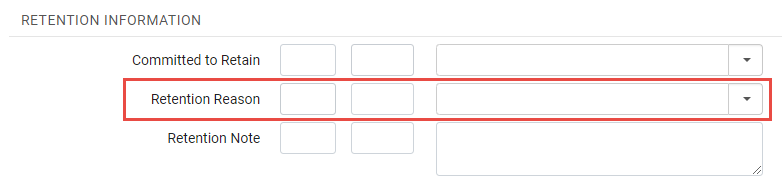
Retention Reason
When an item is Committed to Retain, users have the option to select a retention reason (see image below). The retention reason is an added detail to assist users in understanding why the item is marked for retention. Alma incorporates out-of-the-box values for Retention Reason, but they are customizable. Los usuarios pueden modificar los valores actuales, eliminar valores y añadir otros nuevos.
See also:Bibliographic Record Retention for information to prevent the deletion of a bibliographic record.
- In Alma, select Configuration Menu > Resources > Collection Retention > Item Retention Reason. Aparece la pantalla de Razón de la retención.
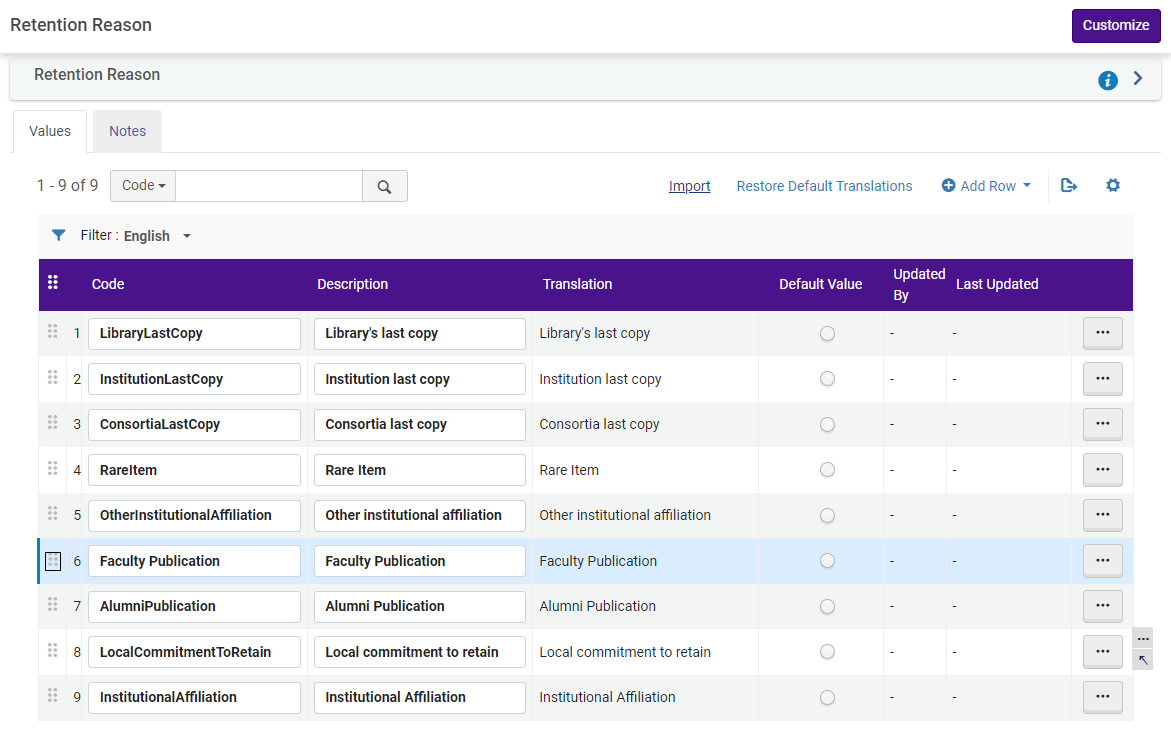 Razón de la retención
- Para modificar un valor actual, haga lo siguiente:
- In the Code column, select any value and enter a desired value, for example, HistoricalItem.
- In the Description column, repeat the value in the Code column (Historical Item) or enter any custom description (Item of Historical Value).La columna Traducción se completa automáticamente cuando se guarda el valor.
- If you want the value to be the default Retention Reason value when assigning an item for Committed to Retain, select the radio button (
 ) in the Default Value column for the value.
- Select Customize. The screen will revert to the Configuration dashboard. Select Resources > Collection Retention > Item Retention Reason to view the updates.
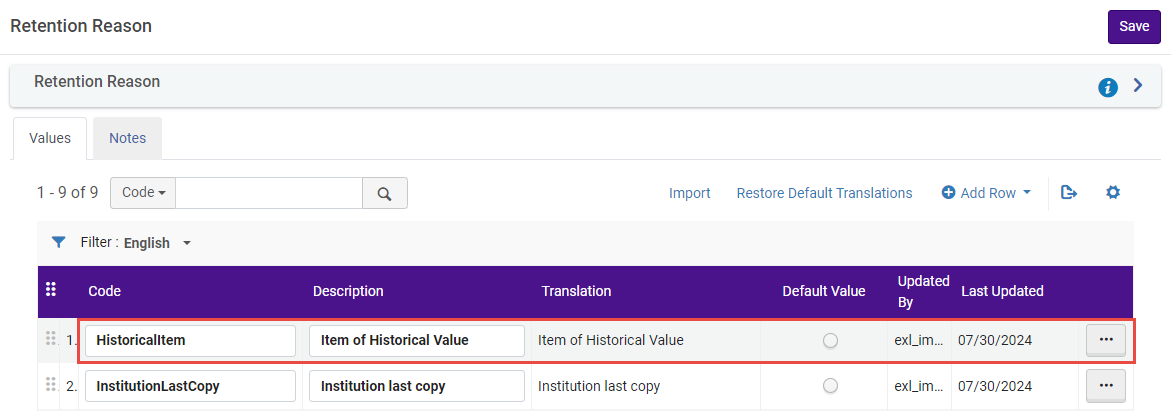 Razón de la retención personalizada
- In Alma, select Configuration Menu > Resources > Collection Retention > Item Retention Reason. Aparece la pantalla de Razón de la retención.
- In the list of values, select the desired value to delete. Select the More actions... button and select Delete. El valor se borra.
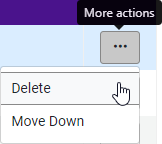 Borrar el valor de la Razón de la retención
- In Alma, select Configuration Menu > Resources > Collection Retention > Item Retention Reason. Aparece la pantalla de Razón de la retención.
- Select Add Row.
- In the drop menu, enter a Code value, Description, and select if the value is to be a default value (Yes/No).
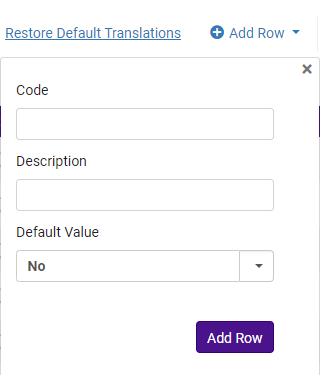 Opciones del menú desplegable Añadir filas
- Select the Add Row button. El valor se añade a la lista Razón de la retención.
Encuadernar (fusionar) ejemplares
You can select two or more items (attached to the same holding) on the List of Items page (see Working with the List of Items) to combine them into a single physical item. Cuando los ejemplares están encuadernados, los ejemplares previos se eliminan y se genera un nuevo ejemplar sin historial.
Items can be bound if they are in place or in a process of a department, are not in the acquisition process, and have not been bound previously.
Items cannot be bound if they are not in place but not in process (e.g., missing, on loan, lost), or have not been received yet (in process type "Acquisition").
If one of the items is Committed to Retain, when the parameter enable_binding_of_items_committed_to_retain(Configuration Menu > Resources > General > Other Settings) is set to false(default ), binding is not allowed, and you receive the following message, "Some of the selected items are committed to retain. They cannot be bound." When set to true(default false) the items can be bound; however, some data loss from the original items occurs. While the Committed to Retain status is preserved, the Retention Reason and Retention Note fields are not transferred to the resulting item.
Sucede lo siguiente cuando los ejemplares se unen:
- For in-process items, if the original items are attached to open PO lines, Alma will attempt to remove the PO line. If this is impossible, Alma will remove the item from the PO line to allow the binding process.
- Los procesos de orden de trabajo en los que se encuentren los ejemplares se completarán.
- Alma will attempt to move item-level requests from the items to be bound to the new item. if the new item cannot fulfill the request, the request is canceled.
- On the List of Items page, select the check boxes for two or more items and select Bind Items. The Bind Items— Items List page appears.
- Select Next. The Bind Items — Generate Work Order page appears.
- Optionally, select a work order type and work order department from the relevant fields, and add notes in the Note field. If the original items are in the same work order type & department , Alma will suggest the same work order for the bound item. The Operator can override this suggestion.
- Seleccionar desde las siguientes opciones:
- Select Create and Edit to create the newly bound item. This opens the Physical Item Editor page, where you can edit the item's details (see Updating Item-Level Information).
- Select Create to create the newly bound item. The item appears as a single item on the List of Items page.
Regarding Alma Analytics for Bound Items:
- The items which get bound into a new item are available for retrieval in Alma Analytics "Physical Items" subject area.
- The items which get bound into a new item will have status "Deleted" in the "Lifecycle" field from the "Physical Item Details" folder.
- In the example below barcode "AU44538" with description "Vol. 1 Issue 1" and barcode "AU44539" with description "Vol. 1 Issue 2" were bound into a new item barcode "AU44541" with description "Vol. 1 Issue 1-2".
- Therefore barcodes "AU44538" and "AU44539" have Lifecycle "Deleted" and barcode "AU44541" has Lifecycle "Active".

Relinking Items to Another Bibliographic Record
Para reenlazar ejemplares a otro registro bib, se debe tener uno de los siguientes roles:
- Gerente del repositorio
- Operador de inventario físico
- Operador de inventario electrónico
- Técnico de inventario electrónico - Limitado
Users with these roles can work with holdings metadata only within the scope defined for the role in the User Details page, see Managing User Roles.
Se pueden mover ejemplares individuales de un registro bibliográfico a otro registro bibliográfico a nivel de ejemplar. Para un registro de existencias que tiene múltiples ejemplares adjuntos, esto significa que se puede mover un ejemplar único de un registro bibliográfico a otro en lugar de mover todos los ejemplares adjuntos al registro de existencias.
- Si la solicitud es a nivel de título, la solicitud se cancela.
- Si la solicitud es a nivel de ejemplar, la solicitud se mueve con el ejemplar.
- On the List of Items page (see Working with the List of Items), select the item that you want to move and select Relink to another Bib. The Relink Items to Another Bibliographic Record page appears. Note that you may also select the Change Location row action for an item on the List of Items page to submit a move request. See Creating a Request for more information.
- Navegar para introducir una descripción del recurso. Aparece la página Búsqueda en el repositorio.
- Realizar una búsqueda para el registro bibliográfico al que quiera enlazar.
- From the search results, select the title to which you want to relink the item, and select Select. Las existencias para el título que seleccionó aparecen en la página Reenlazar ejemplares a otro registro bibliográfico.You can also create a new holdings record (Add New Holdings) to which you can link the item that you want to move.
- Select the holdings record to which you want to relink the item, and select Select.
- Si el ejemplar que se está moviendo es el último ejemplar enlazado a su registro de existencias previo, el sistema le presenta las opciones siguientes para gestionar el registro de existencias previo. Make a selection and select Go. Se redirige a la página Lista de ejemplares.
- No cambiar el registro de existencias
- Borrar el registro de existencias
- Suprimir el registro de existencias de descubrimiento
- Borrar registro bibliográfico (a menos que existan otras existencias)
Control Relinking a Portfolio to Different Bibliographic Record
Users are able to control who can relink a portfolio to a different bibliographic record. To maintain the ability of existing users with the Electronic Inventory Operator role to relink portfolios to another bibliographic record, Alma has implemented two measures. La primera es que se creó un nuevo privilegio para gestionar la visibilidad de la función "Reenlazar a otro registro bibliográfico". Second, a new role called Electronic Inventory Operator - Limited has been introduced. Este nuevo rol es idéntico al rol existente de "Operador de inventario electrónico", excepto que el privilegio para ejecutar la función "Reenlazar a otro registro bibliográfico" está deshabilitado por defecto.
If institutions have added the new Electronic Inventory Operator - Limited role and the "Relink" action on the portfolio is still displayed to users, it is possible that another role has been granted this privilege. In such cases, institutions should contact Ex Libris support to have the privilege removed from the relevant role.
Working with Item Templates
Para trabajar con plantillas de ejemplares, necesita tener los roles y privilegios para añadir nuevos ejemplares físicos.
Es posible guardar un ejemplar físico existente como plantilla y utilizarla al crear manualmente nuevos ejemplares físicos para rellenar previamente campos como notas, política de ejemplar, tipo de material, ubicación temporal, etc.
La plantilla incluirá toda la información del ejemplar excepto:
- Código de barras
- Número de inventario
- Información de patrón
- Tipo de proceso y At (departamento de solicitudes)
- Prefijo / sufijo de Clasificación / Signatura
- Prefijo de Clasificación / Signatura temporal.
- The item's permanent library and location — which are inherited from the item's holdings record.
Using Item Templates to Create Items
When creating an item from a template, the item is pre-populated with the template's data.
Once an operator selects a template to work with, Alma remembers the selection for the user in all manual item creation workflows. Volver a seleccionar una plantilla solo es necesario cuando se cambia el tipo de ejemplar que se está creando.
Añadir ejemplar desde plantilla
La adición de un nuevo ejemplar a partir de una plantilla está disponible en la lista de existencias del ejemplar y al editar un registro de existencias en el Editor de metadatos.
- Selecting Add Item from Template opens the template selection pop-up.
- Select the template you want to use from the drop-down to create your new item. The new item will be opened as a draft, and the operator is able to make any needed changes before saving.Los indicadores de contenido de las pestañas solo aparecerán después de guardar el ejemplar (y no en modo borrador).
Alma will remember the user's template selection in all manual item creation workflows, until the user changes or clears the item template.
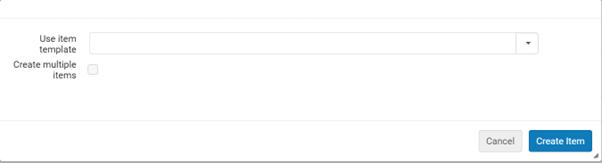
Utilizar una plantilla de ejemplar en la catalogación rápida
El formulario de catalogación rápida Añadir ejemplar físico también permite crear ejemplares a partir de una plantilla, para rellenar previamente el ejemplar creado por ese formulario con los datos de la plantilla.
Cuando se selecciona una plantilla, los demás campos del ejemplar aparecen atenuados, ya que están controlados por la plantilla seleccionada.
Alma remembers the user's template selection in all manual item creation workflows, until the user changes or clears the item template field.
Utilizar plantillas de ejemplares para crear múltiples ejemplares
Al crear ejemplares utilizando una plantilla, es posible añadir varios ejemplares a un registro de existencias.
- Es posible añadir hasta 99 ejemplar en una sola acción.
- Cuando se utiliza una secuencia de código de barras, el sistema comprueba la secuencia actual al crear cada ejemplar (para garantizar la unicidad del código de barras). Por lo tanto, es posible que los códigos de barras no sean secuenciales, si se han creado otros ejemplares en la institución utilizando la misma secuencia mientras se ejecuta el proceso.
Para añadir varios ejemplares, especifique el número de ejemplares que desea añadir.
Esto desencadena un proceso que genera varios ejemplares en el registro de existencias, rellenados previamente a partir de la plantilla de ejemplar seleccionada. The items are created when the job finishes running.
It is also possible to create multiple items in Alma without using templates, with import profiles or the "Item Creator by Excel" CloudApp.
Creating and Updating Item Templates
- To create an item template, open the item editor, make sure only the fields you want populated in the template are filled in the item, and select Save as Template.
- Creating a template can be done from an existing item, or from an item draft. To create a new template based on an existing template, use Add Item from Template to create a pre-populated item draft, make the changes you would like and Save as a template using a different name.
Save as Template fields:
Nombre de la plantilla Seleccione un nombre único y claro para su plantilla. Si utiliza el nombre de una plantilla que ya existe, esa plantilla se actualizará con el contenido de su ejemplar actual. Plantilla existente Seleccione una plantilla existente para actualizarla. See Edit an Existing Template. Plantilla pública Select "No" to create a private template only you can see and use. Select "Yes" to have the template available to all physical inventory operators in the library. Cualquier usuario que pueda crear ejemplares puede utilizar y actualizar una plantilla pública. - Select Save to save your template.
Editar una plantilla existente
- In a holdings record, select Add Item from Template and select the template you wish to edit.
- In the item editor, make the changes you want, and make sure only the fields you want populated in the template are filled in (except for permanent library and location, which are inherited from the holdings record and aren't part of the template workflow).
- Select Save as Template.
- In the Existing template drop-down, select the template you want to update, and select Save.
Cualquier cambio en una plantilla existente actualiza la plantilla con los datos actuales en el editor de ejemplares. If you wish to override a template with data from an existing item, it can be done by opening it in the item editor, selecting Save as Template and selecting the template you want to override.
Borrar una plantilla
- Open the item editor and select Save as Template.
- In "Existing template" select the template you want to delete, and select Delete.

Updating Item-Level Information
El Editor de ejemplar físico permite actualizar la información del ejemplar para los ejemplares físicos.
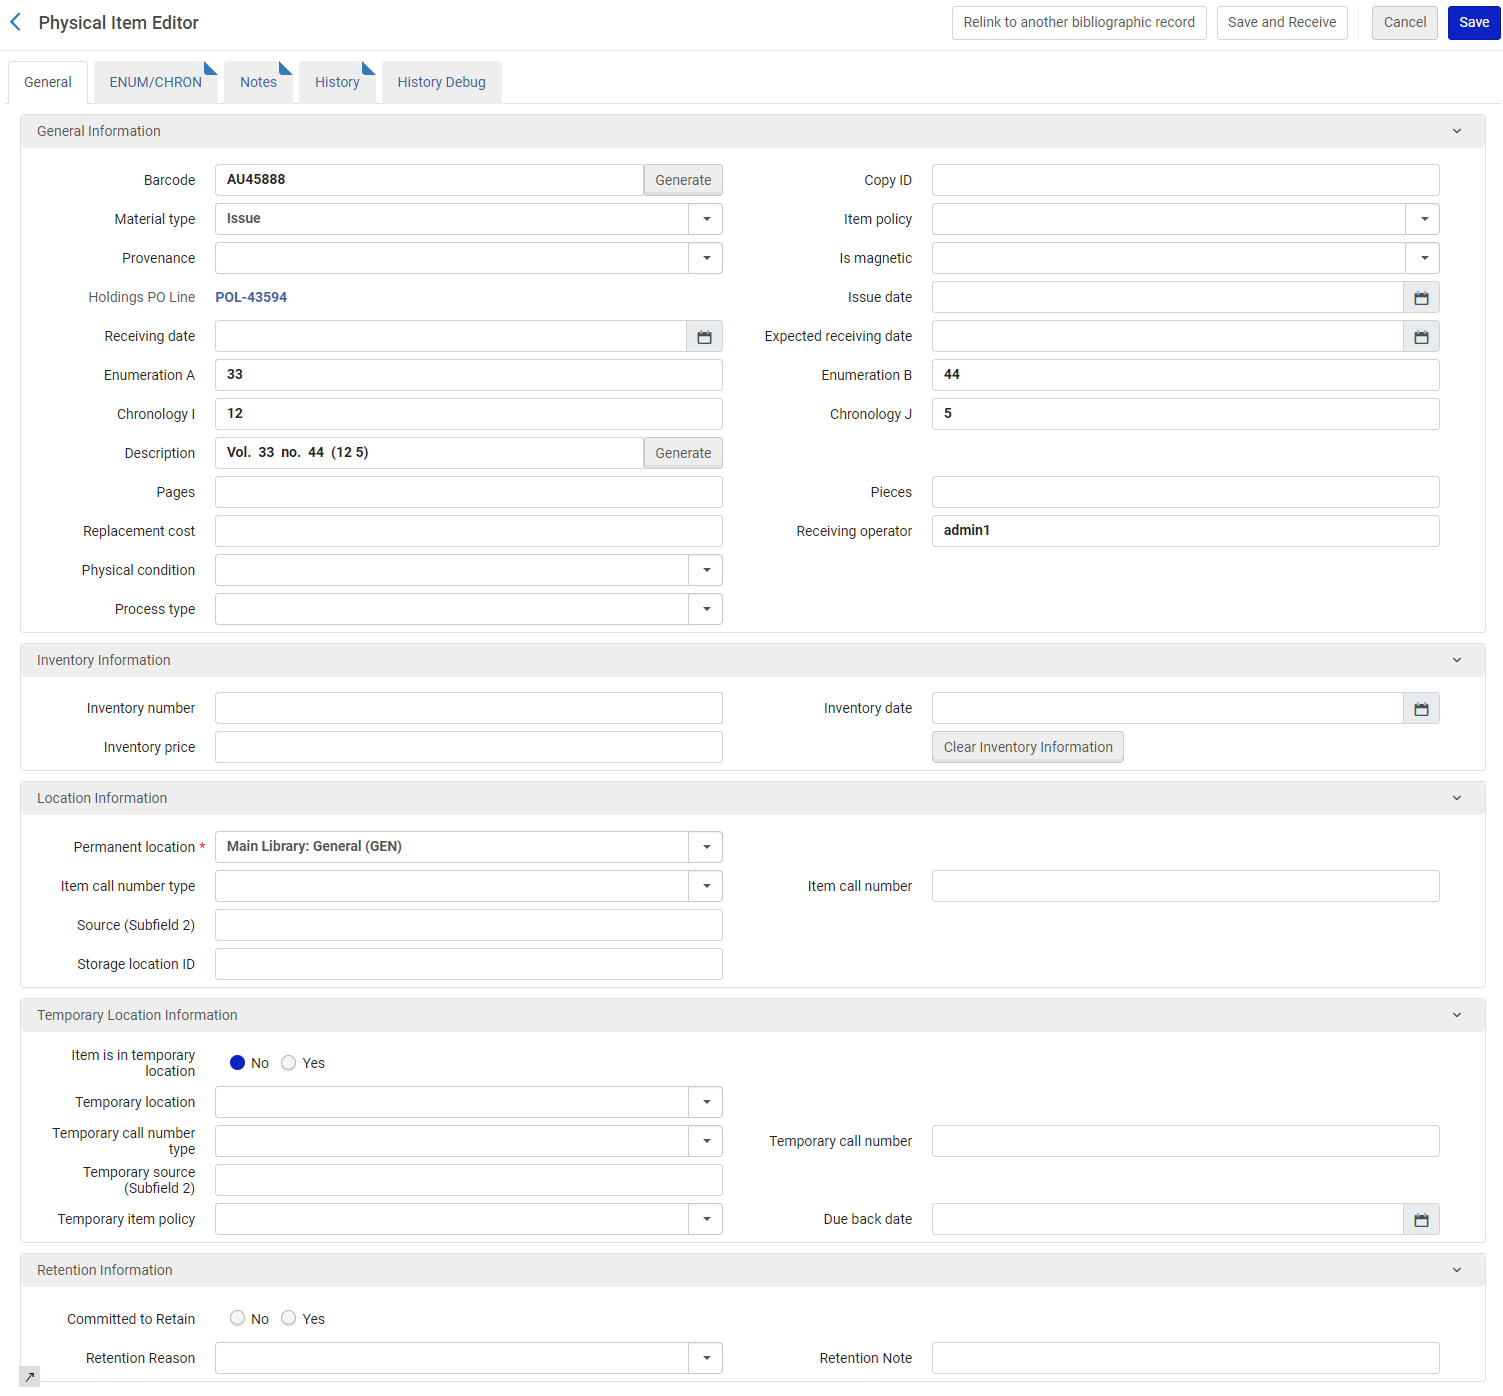
Se pueden crear nuevos ejemplares mientras se trabaja con registros en el Editor MD. See Navigating the MD Editor and Add Item for more information.
- Buscar el ejemplar físico que se quiere actualizar. For more information, see Searching in Alma.Se debe estar buscando un ejemplar físico (no título) para que este procedimiento tenga los resultados descritos a continuación.
- Editar el ejemplar que se quiere actualizar. Aparece la página Editor del ejemplar físico. Véase las siguientes tablas para obtener una descripción de los parámetros de la página Editor de ejemplar físico organizados por las siguientes secciones/pestañas.
- Page header/summary information
- General tab
- ENUM/CHRON tab
- Notes tab
- History tab
Physical Item Editor Page - Page Header Campo Descripción Descripción del recurso Esto identifica el título, el autor, etc. Seleccionar este enlace para abrir la página Ver registro simple MARC bibliográfico. See Viewing Metadata Read-Only in the Simple Record View Page. Existencias Esto identifica la información de la ubicación del registro de existencias. Seleccionar este enlace para abrir la página Ver registro simple MARC de existencias. See Viewing Metadata Read-Only in the Simple Record View Page. Guardar y recibir Permite a los usuarios trabajar en un ejemplar (en el Editor de ejemplar), guardarlo y recibirlo en una sola acción. Upon selecting Send and Receive, a dialogue window is displayed enabling users to fill in the receiving date and select whether to keep in department. El botón Guardar y recibir se activa en las siguientes condiciones:
- Usuarios con funciones de Operador de recepción/Gerente de recepción para la biblioteca propietaria o usuarios con funciones de Operador de recepción/Gerente de recepción para una biblioteca designada como "adquirir para" la biblioteca propietaria de la línea de orden de compra.
Cuando el campo "Fecha de recepción" está sin rellenar y el campo "Línea de orden de compra" está rellenado.
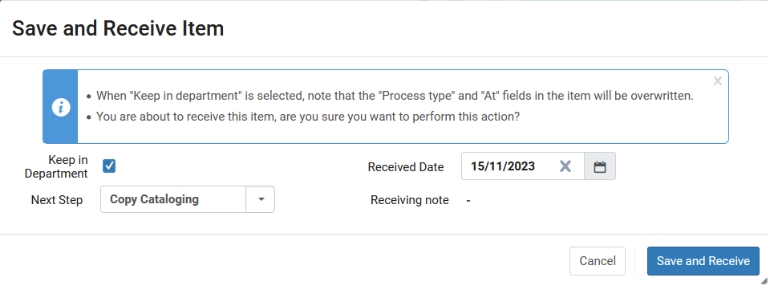 Ventana emergente de Enviar y recibir ejemplar
The Keep in Department,Next Step and Received Date fields are populated with the same values as in the "Receive New Material". Si estos campos se modifican en la ventana emergente, sus valores se guardarán como preferencias del usuario.
Selecting Save and Receive, the item is saved with the Received Date, Receiving operator, and Process type and "At" when "Keep in Department" is selected. La línea de orden de compra avanzará en el flujo de trabajo (igual que si la recepción se hiciera desde la página "Recibir nuevo material" o desde la propia línea de orden de compra.
El departamento que aparece en "Actualmente en" afecta directamente la capacidad de guardar y recibir el ejemplar; ocurre un error si el usuario no está en el departamento correcto. Además, los valores mostrados en el campo "Paso siguiente" de la ventana de diálogo corresponden al departamento "Actualmente en".
Código de barras Esto identifica el número del código de barras del ejemplar. Tipo de proceso Este puede ser uno de los tipos de proceso automático (como perdido, préstamo, tránsito) o un tipo de orden de trabajo. ID de existencias Esto muestra el número ID del registro de existencias. ID del ejemplar Esto muestra el número ID del ejemplar. Estado
Esto especifica el estado del ejemplar (como ejemplar en el lugar).
See Changing an Item's Status for more information.
Ver todas las existencias Select this link to open the List of Holdings page associated with the item that you're editing. Ver todos los ejemplares Select this link to open the List of Items page that lists all the items associated with the same holdings record. Navegar en la lista de topográficos Select to open the browse shelf listing where you can search for call numbers that can be copied and later pasted into the Physical Item Editor page when you select Back to return.Cuando se usa esta opción, se rellenan automáticamente los parámetros Biblioteca y Ubicación de la información del registro del ejemplar y el Tipo de clasificación (si tiene uno, determinado por la configuración del Tipo de clasificación para la Ubicación física en la página Editar ubicación física).See Browsing the Shelf Listing for more information.
You can configure a description template to use when generating an item description based on the ENUM/CHRON Information tab. You do that from the Description Template Setup Rules page (Configuration Menu > Resources > General > Description Templates). See Configuring Item Description Templates.Physical Item Editor Page - General Tab Parámetro Descripción Código de barras This parameter identifies the item's barcode. Si el parámetro del código de barras está vacío, añadir un código de barras usando uno de los siguientes métodos:- Escribir manualmente un código de barras.
- Select Generate. If your Barcode Generation Configuration is configured with multiple barcode counter sequences (see Configuring the Barcode Generation Method and Barcode Validation for more information), a pop-up appears from which you can choose the barcode generation sequence for this item.Si su Configuración de la generación de códigos de barras incluye secuencias del contador de códigos de barras a nivel de biblioteca, el sistema comprueba la ubicación de las existencias mostrada para el ejemplar físico que se está editando y presenta las secuencias del contador de códigos de barras a nivel de biblioteca para esa biblioteca además de las secuencias del contador de códigos de barras a nivel de institución que se han configurado.Si el sistema comprueba la ubicación de las existencias mostrada para el ejemplar físico que se esté editando y determina que no hay ninguna configuración de la secuencia del contador de códigos de barras a nivel de biblioteca para esa ubicación, solo aparecen las secuencias del contador de códigos de barras a nivel de institución en el cuadro de diálogo emergente.
- Select Save. If the barcode parameter is empty when you select Save and you have configured your system for automatic barcode generation, the system automatically creates a barcode for the item using the default barcode counter sequence (see Configuring the Barcode Generation Method and Barcode Validation for more information). Como se ha descrito anteriormente, si hay una configuración de la secuencia del contador de códigos de barras a nivel de biblioteca que coincida con la biblioteca de existencias, se usa la configuración de la secuencia del contador de códigos de barras a nivel de biblioteca predeterminada (cuando hay múltiples configuraciones de secuencias del contador de códigos de barras a nivel de biblioteca para la misma biblioteca). Si no hay ninguna configuración de la secuencia del contador de códigos de barras a nivel de biblioteca que coincida con la biblioteca de existencias, se usa la configuración de la secuencia del contador de códigos de barras a nivel de institución predeterminada.
- For locations with RFID and an active RFID connection as indicated by the connection icon ( . ), the barcode can be added/updated in the Barcode box by selecting the RFID read icon (or Alt+A). For additional information, see RFID Support.
ID de la copia The item's copy ID, used to identify individual copies of the same title when multiple copies exist at the same location. LCCN The item's physical form, such as a book or CD-ROM. Seleccionar de la lista desplegable predefinida. Note that the material type manifests itself only in Primo Get It/Details tabs. (For information on customizing the material type labels, see Configuring Physical Item Material Type Descriptions.) Política del ejemplar The item's override policy for loan rules. Definir las condiciones en las que se puede realizar la solicitud de dicho ejemplar. Select from items in the drop-down list (see Configuring Item Policies). Procedencia The provenance code indicating the item's origin, as selected from options in the drop-down menu. To configure these options, see Configuring Provenance Codes.
If joint use of inventory was configured for the institution, where one institution can order for another institution in a Consortia, this field indicates the purchasing institution (if this was set up). For details, see Joint User of Inventory in Consortia.
Es magnético Options are Yes or No. Specifies whether or not the item contains digital properties that may be damaged by a self-check machine. If Yes is selected, the self-check machine does not attempt to demagnetize the item, which can cause damage to the resource. El valor normalmente sería Sí para los ejemplares como los CD-ROMs y los casetes digitales. Línea de la Orden de Compra
Note that this parameter only appears after you have entered the basic, required information and selected Save and Edit.
Use el icono de lista rápida para abrir la página Seleccionar línea de la orden de compra para localizar una línea de orden de compra para el ejemplar.
After you have selected a PO line or if a PO line is already selected for the PO Line parameter and you have the appropriate role, select the View Details link to view more information regarding the selected PO line.
 Línea de orden de compra seleccionada en el editor de ejemplares físicosSolo aparecen en la lista las líneas de la orden de compra para ejemplares físicos sencillos.
Fecha de emisión La fecha de emisión generada desde un patrón de predicción. Fecha recepción La fecha en que el material realmente se recibió/activó por primera vez. Select the Receiving date box and select the receiving date from the calendar dialog box. Fecha de recepción prevista La fecha en la que se esperaba recibir el ejemplar. Enumeración A
El principal nivel de enumeración, normalmente el volumen.
Tenga en cuenta que esto solo debe utilizarse para publicaciones seriadas y monografías en varias partes.
Enumeración B
El segundo nivel de enumeración, como el trimestre.
Tenga en cuenta que esto solo debe utilizarse para publicaciones seriadas y monografías en varias partes.
Cronología I El principal nivel de cronología, normalmente el año. Cronología J El segundo nivel de cronología, normalmente el mes. Descripción (generar) System or user-generated description based on entries in the Enumeration and Chronology fields above and in the ENUM/CHRON tab. Select Generate to have Alma enter the description. To configure a description template, see Configuring Description Templates. Este campo puede utilizarse para determinar si el ejemplar físico se considera una monografía o una publicación seriada. Si el campo está definido (contiene algún caracter), el ejemplar se considera una publicación seriada (o posiblemente una monografía multivolumen con los números de volumen que aparecen). Si el campo está vacío, el ejemplar se considera una monografía.Only the first 256 characters of the description appear in the Primo Get It tab (in a drop-down list). Se recomienda que la descripción sea más breve que este límite, para que sea visible correctamente en la pestaña Get It.Páginas The item's number of pages. Piezas The item's number of pieces. Coste de reemplazo El cargo administrado al usuario si el ejemplar se pierde. You can configure whether the PO line price is copied to the Replacement cost field in the item for physical one time orders. You can also define whether to add or reduce the amount to the PO line price being copied to the item's Replacement cost field. For more information see Configuring Other Settings. Operador de recepción El operador que recibió el ejemplar Tipo de proceso Cómo se está procesando actualmente la orden de trabajo. When selecting a value in this field, the At field displays the location in which the work order is performed. Después de guardar el ejemplar, la siguiente información aparece en la página Buscar en el repositorio:- Process type: How the work order is currently being processed
- Status: Value is Item not in place
This information also appears on the Resource Request Monitoring page (see Managing Requests and Work Orders).To remove an existing work order from an item, clear this field when accessing the Physical Item Editor page from the Edit link for an item. The Status of the item displays on the Repository Search page as Item in place. Note that this workflow skips the next step calculation used when marking a work order as "Done", and therefore requests are not activated unless the item is scanned in.For more information about assigning a work order process to an item, see the Assign a Process to an Item video (2:54 mins).Condición física Seleccionar una de las siguientes opciones para identificar la condición física del ejemplar: - Quebradizo
- Dañado
- Deteriorando
- Frágil
Después de que se identifique y se guarde una condición física con el registro del ejemplar, esta información puede seleccionarse para publicarse cuando se publica el inventario físico y se usa como criterio para la búsqueda avanzada. Cuando se ejecuta la tarea Cambiar ejemplares físicos, la Condición física está disponible como parámetro para cambiar otros cambios.En A work order department for the work order that appears in the Process type field. After saving the item, value of this field (that is, the location of the item) displays on the Repository Search page as the At: field value.Inventory Information: Número de inventario Introducir/asignar un número de inventario para este ejemplar físico, hasta 20 caracteres. Se puede introducir un número manualmente. If inventory numbers are configured for your library (see Configuring Physical Item Sequences), select Allocate to enter the next number. If more than one numbering sequence is defined for the library, select the desired sequence from the Sequence List dialog box and select Select. Si quiere, puede usar el mismo número para múltiples ejemplares físicos.Precio de inventario El precio del ejemplar. If you select Allocate to set an inventory number, the price is taken from the PO line, if one exists (using the currency of the PO line). Se puede cambiar esto para que refleje el valor real del ejemplar a la biblioteca (cuánto costará reemplazarlo, por ejemplo).
Inventory price is not what patrons are billed when the item is lost. For that purpose, see the "Replacement cost" field.
Para valores inferiores a 1, introducir un 0 inicial. For example,0.44, not .44.Se presupone que el valor está en la moneda predeterminada de su institución. For more information, see Configuring Currency Subsets.Users can validate the item inventory price by configuring the regular expression (regex) that determines which characters may be used when manually entering an inventory price in the item editor. When an item with an invalid value in the inventory price is edited and saved, the operator will be alerted that the inventory price doesn't match the institution's configuration, so they can check and correct the data if needed. The validation of the item inventory price is controlled by the customer parameter (CP):item_editor_inventory_price_regex that is accessed from the Resources mapping table (Configuration > Resources > General > Other Settings). For more information on the CP, see Configuring Other Settings (Resource Management).Fecha de inventario
Introducir o seleccionar una fecha de inventario.
If you select Allocate to set an inventory number, this field is populated with today's date. Si es necesario, seleccionar una fecha alternativa.
Botón Eliminar información de inventario Usar esta opción para eliminar todos los parámetros de inventario en esta sección. Receiving number
Enter/allocate a receiving number for this physical item. Note that this parameter only appears when a Receiving Number sequence is configured (see Configuring Physical Item Sequences).
You can enter a number manually or select Allocate if receiving sequence numbers are configured for your library. When you select Allocate, the next number in the sequence is added to this parameter. If more than one numbering sequence is defined for the library, select the desired sequence from the Sequence List dialog box and select Select. Si quiere, puede usar el mismo número para múltiples ejemplares físicos.
Número de depuración
Enter/allocate a weeding number for this physical item. Note that this parameter only appears when a Weeding Number sequence is configured (see Configuring Physical Item Sequences).
You can enter a number manually or select Allocate if weeding sequence numbers are configured for your library (see Configuring Physical Item Sequences). When you select Allocate, the next number in the sequence is added to this parameter. If more than one numbering sequence is defined for the library, select the desired sequence from the Sequence List dialog box and select Select. Si quiere, puede usar el mismo número para múltiples ejemplares físicos.
Fecha de depuración
Enter or select a weeding date for this physical item. Note that this parameter only appears when a Weeding Number sequence is configured (see Configuring Physical Item Sequences).
If you select Allocate to set a weeding number, this field is populated with today's date. Si es necesario, seleccionar una fecha alternativa.
Location Information: Ubicación permanente Seleccionar la biblioteca permanente y la ubicación de la biblioteca. For more information, see Moving Items Between Holdings and Deleting Holdings Records.
When a holdings record holds only a single item, and you move this item to a different location, the item remains associated to the same holdings record, and only the holdings' details are modified. An indication that recent changes to the holdings record took place appears in the History tab of the Physical Item Editor that states "There have been Holdings changes in the past 6 months". This indication appears when any type of change in the holdings took place, not only when the location has changed. Select the Holdings changes button to view the history of item changes. Tenga en cuenta que este comportamiento solo tiene lugar para un registro de existencias con un único ejemplar. When the holdings record has several items and you want to move some of these items, then a new holdings record is created, and all the selected items are moved to that holdings record. Después de mover los ejemplares, si el registro de la existencia original permanece sin ejemplares, se borrará.
Tipo de clasificación del ejemplar Seleccionar un tipo de identificación alternativa para la clasificación en la lista de menú. Algunos ejemplos de opciones incluyen: - Clasificación de la Biblioteca del Congreso
- Clasificación decimal de Dewey
- Clasificación de la Biblioteca Nacional de Medicina
- Source specified in subfield $2 (see Source (Subfield 2) for more information)
Clasificación del ejemplar La clasificación para el ejemplar específico cuando difiere de la clasificación que puede estar presente en el registro de existencias. Fuente (Subcampo 2) Introducir la fuente de clasificación/signatura que sea equivalente al $2 en el registro de existencias. Esto es relevante cuando el tipo de clasificación/signatura es la Fuente especificada en el subcampo 2. See Browsing the Shelf Listing for more information. Identificación de la ubicación de almacenamientoEl número de identificación de la ubicación donde está almacenado el ejemplar.Seleccionar prefijo Enter a prefix and/or use it in combination with Generate and/or Calculate, as described below. Generar - To enable call-number generation on-the-fly set the following customer parameters need to be set to True(Configuration Menu > Resources > General Configuration Other Settings):accession_number_applicative_seq and item_call_numbers_generate_enable.
- La concatenación de sufijos está deshabilitada por defecto. Contact Ex Libris staff to activate it in coordination with your institution.
Generar un número de clasificación del ejemplar usando cualquiera de los métodos siguientes:
Use cuando: Acción: The prefix already exists in Alma and you know it.Enter the exact prefix for the sequence (as configured in the Accessions Numbers configuration table, see Configuring Accession Numbers) in the "Choose Prefix" field, and select Generate.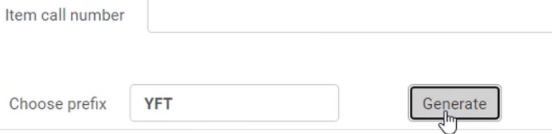 When 'YFT' prefix is an existing prefix in AlmaThe prefix already exists in Alma, and you would like to select it from a list.Select Generate without specifying any prefix in the "Choose Prefix" field. El sistema muestra una lista de prefijos que coinciden con su biblioteca y ubicación. Seleccione el prefijo deseado. El sistema lo muestra en el campo "Seleccionar Prefijo". Then select Generate to generate the numberThe system presents the following message: "An accession number sequence with the prefix <prefix> was selected and will be used to generate the call number upon save. The expected value is <expected value>."
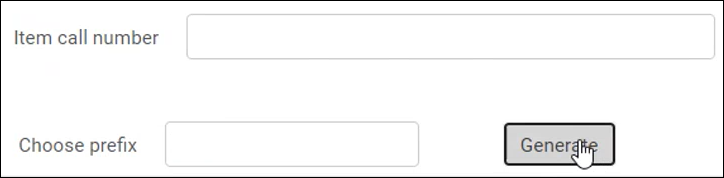 The prefix does not exist in Alma and you want to set it.
Enter the desired prefix in the "Choose Prefix" field, and select Generate. The system presents the following message: "An accession number sequence with the prefix <prefix> was selected and will be used to generate the call number upon save. The expected value is <expected value>."
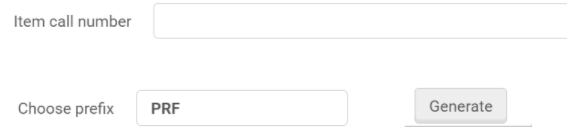 When 'PRF' prefix does not yet exist in AlmaIn addition, Alma saves this prefix for future use in the Accessions Numbers configuration table, see Configuring Accession Numbers.The number that is generated will be determined by the matching sequence found in the Accession Numbers configuration (see Configuring Accession Numbers for more information). The number is generated after you select Save.The Other Settings parameter item_call_numbers_generate_enable must be set to true for Generate to appear (see Configuring Other Settings (Resource Management) for more information).For more information on generating an item call number, watch the Generate Alternative and Temporary Item-Level Call Numbers video (2:51 mins).
Calcular Use Calculate to create an alternative item-level call number based on existing call numbers in the Alma repository. Enter a full prefix for the Choose prefix parameter to help the system locate a matching prefix in the Alma repository in order to create a call number.The call number that is created is generated after you select Save.Your system may be configured to use both Calculate and Generate on the Physical Item Editor page or only one of either of these features.Calculate needs to be configured by Ex Libris.Due to a technical issue, when using Calculate with both the Alternative and Temporary call numbers for the same prefix at the same time, an identical sequence is calculated and saved in both.When enabled for your institution, the use of Calculate can be restricted at the library-level so that only institution-level sequence configurations can be used. See Library for configuration information regarding the Disable Item Call Number Calculation option.Temporary Location Information: Ejemplares en ubicación temporal (Sí/No). Si el ejemplar está localizado en una ubicación temporal. Setting this to No does not clear the item's temporary library and location values (see the next two fields). Hay algunas situaciones en las que se desearía marcar la biblioteca temporal y la ubicación del ejemplar antes de indicar que el ejemplar está realmente en esa ubicación. For lending requests, before shipping, if the item was already in a temporary location, then, when returned, the item will revert back to the previous temporary location. Tenga en cuenta que esto solo se aplica a la ubicación temporal y no a otras condiciones temporales como el tipo de clasificación/signatura temporal, la fecha de vencimiento, etc.You can remove items' temporary location indications in bulk using the Change physical items job. See Performing Global Changes on Physical Item Records for more information.For more information about modifying this setting using the Change Physical Items job, see the Remove Temporary Item Location Indicator video (5:27 mins).Localización temporal Seleccionar la biblioteca temporal y la ubicación de la biblioteca.Se debe especificar una biblioteca temporal para que las características Seleccionar prefijo, Generar y Calcular aparezcan para una ubicación temporal.Tipo de Clasificación/Signatura temporal El tipo de clasificación/signatura usado para el ejemplar en la ubicación temporal. Clasificación/Signatura temporal The item's call number when using the temporary call number type at the temporary location.
The Permanent Call Number will be displayed for the temporary location in Alma and Primo, if there is no temporary call number assigned.
Fuente (Subcampo 2) Introducir la fuente de clasificación/signatura que sea equivalente al $2 en el registro de existencias. Esto es relevante cuando el tipo de clasificación/signatura es la Fuente especificada en el subcampo 2. See Browsing the Shelf Listing for more information. Política temporal del ejemplar The item's temporary override policy. Las políticas se configuran y aparecen en la lista del menú. Seleccionar prefijo Enter a prefix and/or use it in combination with Generate and/or Calculate. Generar Generate a temporary call number using the methods describe above for Generate. See Temporary Library for more information. Calcular Use Calculate to create a temporary item-level call number based on existing call numbers in the Alma repository. See Calculate and Temporary Library above for more information. Due to a technical issue, when using Calculate with both the Alternative and Temporary call numbers for the same prefix at the same time, an identical sequence is calculated and saved in both.Fecha del plazo de devolución La fecha en la que el ejemplar debe devolverse desde la ubicación temporal. Retention Information: Comprometido para retener Select Yes/No to mark items as committed to retain and prevent withdrawing them. This is useful when several libraries pool their resources together and some of the library's items need to be retained even when internal usage is low. This is reflected in Alma Analytics in order to help libraries to manage their collaborative collections.
Upon selecting "Yes", the Committed to Retain icon (
 ) is displayed for the physical item in the Item Editor.
Esta función también se admite en importaciones, exportaciones y flujos de trabajo de API.
Razón de la retención La razón por la cual la biblioteca se ha comprometido a retener el ejemplar. El menú desplegable permite a los usuarios seleccionar y compartir valores de la Razón de retención con todos los miembros. - La Razon de retención solo se puede buscar en la Búsqueda avanzada. La Búsqueda simple solo busca por código y no por descripción.
- Es posible añadir valores o suprimir valores predeterminados.
- In the context of "Consortia", the central office can define and share "Retention Reason" values with all members with the Manage Table in Network option.
Possible codes are listed in the 'Retention Reason'code table. Los valores válidos para este parámetro están controlados por la tabla de códigos: Razón de la retención. Estos son los valores definidos actualmente:
- Publicación de antiguos alumnos
- Última copia del consorcio
- Publicación de la facultad
- Última copia de la institución
- Afiliación institucional
- Library's last copy
- Comprometido a retenerlo localmente
- Otra afiliación institucional
- Ejemplar poco común
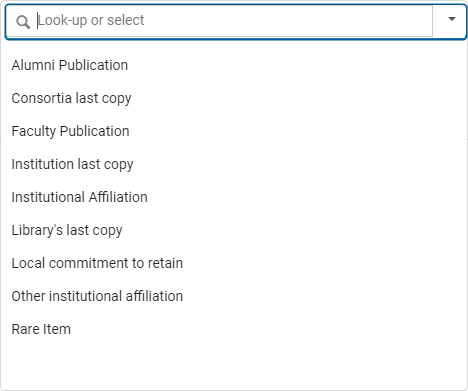 Razón de la retención - Valores predeterminados
Nota de la retención Una nota de texto libre sobre el compromiso de la biblioteca de retener el ejemplar. Página Editor de ejemplares físicos - Pestaña ENUM/CHRON Tipo de nota Descripción Año del fascículo Información sobre el año.
This field is not editable and is kept in view mode only to support customers that previously used it.
Enumeración de A a H Los niveles múltiples de enumeración. Cronología de I a M. Los niveles múltiples de cronología. Indicador de corte Currently under development. Código que indica la razón de un corte en la enumeración o en la cronología.Pattern Information: Tipo de Patrón Una lista de 85X campos únicos del registro de existencias de un ejemplar. For example, if the holdings record contains 853 and 854 fields, the list contains 3 853 and 4 854. Número de enlace La lista de subcamps $8 de los campos 85X actualmente seleccionados. For example, if Pattern Type is 3 853, and the holdings record contains two 853 fields with subfields $8 with values 1 and 2, the list contains 1 and 2. Tipo de unidad El tipo de unidad. This is a read-only field populated on the fly by the FIRST subfield $o of the relevant Pattern Type and Linking Number. Physical Item Editor Page - Notes Tab Tipo de nota Descripción Longitud máxima Nota pública Note content displayed in the Primo Get It tab under the Holdings column. See Displaying Public Notes. 4.000 caracteres Nota de servicios al usuario Contenido de la nota mostrado durante el proceso de circulación. Por ejemplo, el contenido puede tener la afirmación “Verificar discos” para avisar al mostrador de circulación en la devolución del ejemplar. 4.000 caracteres Internal Notes: Las notas internas solo pueden ser vistas por los miembros del personal y no por los usuarios; sin embargo, están expuestas a los miembros del personal de otras zonas de la institución que comparten su red.
Nota interna 1 Note content for internal use by Alma staff. 4.000 caracteres Nota interna 2 Note content for internal use by Alma staff. 4.000 caracteres Nota interna 3 Note content for internal use by Alma staff. Specifically, this note may contain content regarding a shipped resource sharing lending item, as sent to Alma by the NCIP source system in the NCIP message's shipping note. La nota de envío aparece en el formato siguiente:||Shipping Note||<text of shipping note>||Shipping Note||La nota de envío la utilizan los implementadores de NCIP, como el Navegador OCLC, para actualizar el sistema de la biblioteca con información adicional sobre ejemplares enviados de préstamo de recursos compartidos, así como con información sobre el recurso en sí mismo, el solicitante y las ubicaciones desde las que se solicita y se recoge.4.000 caracteres Statistics Notes: El contenido de las notas estadísticas se selecciona desde una lista de menú personalizada que se configura. See Configuring Statistics Notes for information about configuring fixed drop-down lists of options for statistics notes.Nota estadística 1 Note content selected and saved is exposed in Analytics under New > Analysis > Physical Items. 4.000 caracteres Nota estadística 2 Note content selected and saved is exposed in Analytics under New > Analysis > Physical Items. 4.000 caracteres Nota estadística 3 Note content selected and saved is exposed in Analytics under New > Analysis > Physical Items. 4.000 caracteres Physical Item Editor Page - History Tab Parámetro Descripción Report type: Cambios de ejemplar Los cambios hechos al ejemplar como visible/editable en la pestaña General de la página del Editor de ejemplar físico. Este informe identifica el nombre del operador que hizo el cambio, la fecha en la que se hizo el cambio, el campo que se cambió y los valores antes y después. Cambios en existencias Cambios a la biblioteca (852 $$b), ubicación (852 $$c), tipo de clasificación (852 primer indicador), clasificación (852 h, i, j, k, l, m) y el número de acceso. Este informe identifica el nombre del operador que hizo el cambio, la fecha en la que se hizo el cambio, el campo que se cambió y los valores antes y después.Changes to the last item under the holding do not appear in this tab; they appear only under the Holdings tab (in the Item Editor). El motivo es que, en este caso, se cambia la existencia vigente en lugar de crear una nueva.
Actividades de servicios al usuario Actividad de préstamo/devolución. El informe identifica la fecha en la que se hizo el cambio, el tipo de acción completada (préstamo/devolución), el nombre del operador/nombre de mostrador que hizo el cambio, el nombre del prestatario y la ID del prestatario. La información de uso/préstamo de uso interno se muestra en la página. The borrower name and ID are displayed only for the following roles: Circulation Desk Operator, Circulation Desk Manager, Circulation Desk Operator - Limited, Requests Operator, Fulfillment Services Operator, Fulfillment Services Manager, Resource Sharing Partners Manager, Fulfillment Administrator, User Administrator, General System Administrator. Para deshabilitar este privilegio para cualquiera de los roles arriba mencionados, o para habilitar el privilegio para otros roles, contactar con el soporte de Ex Libris.La columna Operador aparece solo para gestores y administradores. See Configuring Users' Ability to View Operator Details. - Select one or more of the following tabs to view or make changes to the physical item's information:
- General Information (see the Physical Item Editor Page - General Tab table above)
- ENUM/CHRON Information (see the Physical Item Editor Page - ENUM/CHRON Tab table above)
- Notes (see the Physical Item Editor Page - Notes Tab table above)
- History (see the Physical Item Editor Page - History Tab table above)
- Select Save when you have completed making your changes.
- For items that are missing or not in place, you have the additional option to Save and Toggle Missing Status, enabling you to also toggle the item's missing status from "in place" to "missing" or from "missing" to "in place".When you select Save and Toggle Missing Status, Alma saves any changes made to the item in the editor and then toggles the missing status, adding or removing a "missing" process type. If an item is in another process type, this option is disabled, and if an operator adds a process type to an item in place and then selects Save and Toggle Missing Status, only the selected process type will be saved, and the "missing" process type will not be applied.
- For locations with RFID and an active RFID connection as indicated by the connection icon, you have the additional option to Write to RFID and Save.When you select Write to RFID and Save, the information is written to the Alma database. When the information has successfully been written to the Alma database, the information is saved to the RFID. Si hay más de una pieza especificada para el parámetro Piezas, se recuerda gestionar las piezas adicionales. Véase abajo un ejemplo del aviso. For additional information, see RFID Support.
- If you only want to update information in the Alma database, select Save.
